KeyCom’s KeySMS service is used for sending notifications to customers included in KeyCom’s customer register, for example, in the event of errors or incidents. You can send a notification to a maximum of 500 recipients at a time.
The KeySMS  icon can be found in the main toolbar.
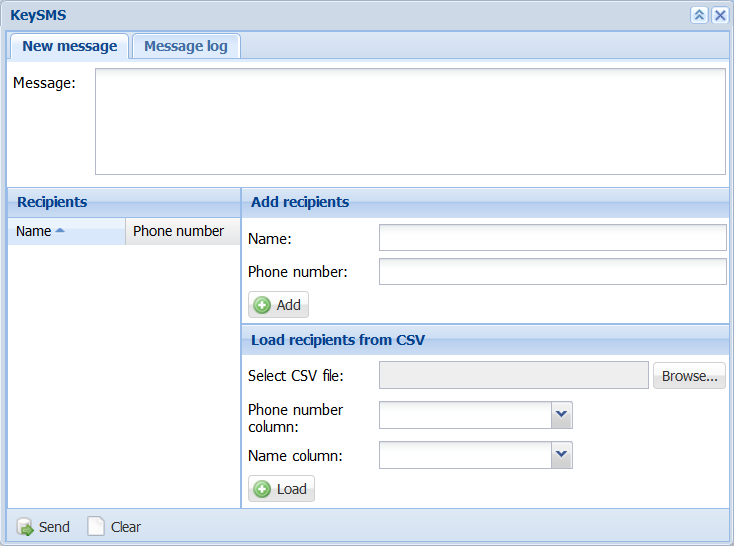
The KeySMS form has two tabs: New message and Message log. SMSs are sent through the first tab. Add customers/phone numbers to the form for sending the text message. Enter your message in the Message field and click Send  . Information on sent messages is stored on the Message log tab.
Adding recipients to the form
There are various ways to create a group of recipients: Each group of new phone numbers is added to the existing phone numbers on the form. If a phone number is already included in the list, only one SMS will be sent to it.
Adding individual recipients
Go to the Add recipients section to add recipients. Complete the Name and Phone number fields and click Add  next to the fields. The added customer information is displayed in the list of Recipients. Phone number information is mandatory, but adding a name will help you distinguish one phone number from another on the object list.

To delete recipients, use the right mouse button to click a row on the list of Recipients and click  Remove selected. You can select multiple rows by holding down the Shift or Control key.
Importing recipients from the Customer form
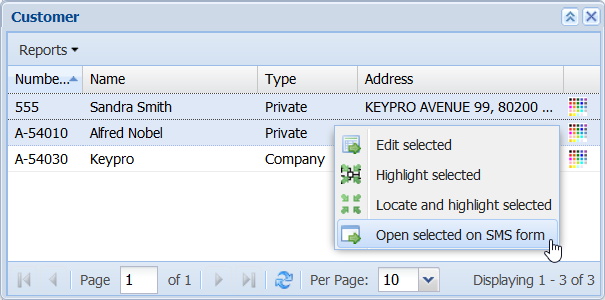
You can import recipients to the KeySMS form through the Customer form. You can retrieve Customers to the Customer form by using the available tools for searching and picking. When you have picked a target group to the Customer form, click Show in list  . On the displayed Customer list, select the contact rows that you want to use for sending an SMS. Click the right mouse button and select
  Open selected on SMS form.
Importing recipients from an external file
You can import a group of recipients to the SMS form from an external CSV file.
- Click Browse to search a local disk for the file to be loaded.
- In the Phone number column and Name column fields you must define the column in which the names and phone numbers of the target persons can be found in the CSV file.
- On the SMS form, click Load
 to import.
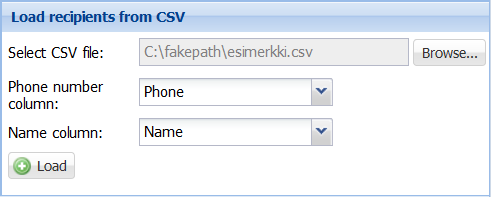
- The list of Recipients now includes the contact information you added.
For example, the format of the CSV file can be: Name;Address;Phone number:
Example person 1;Teollisuuskatu 13;0401234567
Example person 2;Horsmakuja 8;0501234567
In this example, the following selections are used: The Phone number column is “Phone number” and the Name column is “Name”.
Note! CSV files must use UTF-8 encoding. You can ensure this, for example, by saving the file with the Save as function of the Notepad program and by selecting UTF-8 in the Encoding field.
Writing and sending messages
When you have created a recipient group on the KeySMS form, you can write and send messages. Enter your message in the Message field and click Send  . A notification of the approved recipients is displayed at the bottom of the form. Additional information is available on the Message log tab.
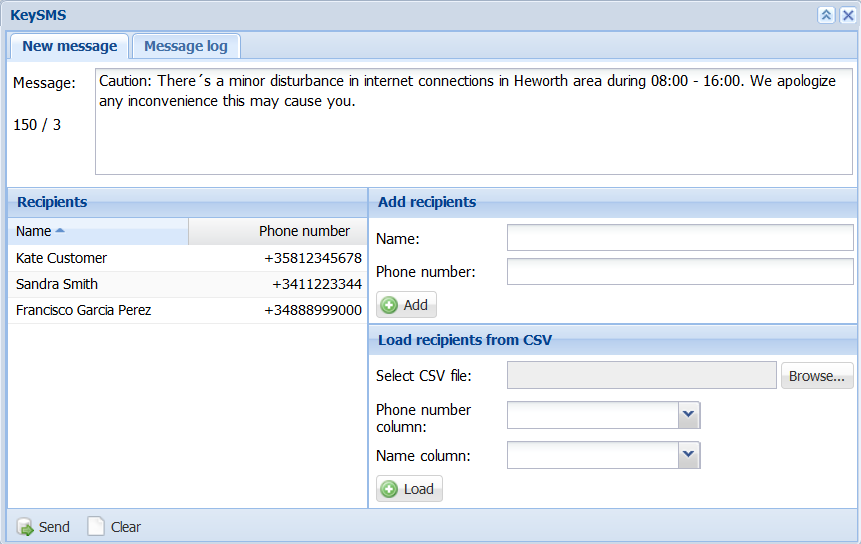
When you write an SMS, please note that the maximum number of characters in one SMS is 70. If the message has more characters, it will be sent in several parts. The figures displayed next to the message field provide information on the number of messages 175/3. The latter number is the number of messages, whereas the first number is the number of the used characters.
For example, there are 50 recipients, and the text requires 3 messages. This means that 3 * 50 = 150 messages will be sent.
Note! If a specific number occurs several times, the message will be sent only once to this number.
Linking alert information sites to text messages
After completing the message and contact details on the KeySMS form, as instructed in the Writing and sending messages chapter, click Alert  to continue with the creation of an Alert. Please note that if the function is not activated in your system as an additional service, the button will not be available!
On the Alerts form that is displayed, the Description fields have been pre-filled in accordance with the message on the KeySMS form. Create an alert, as instructed in the Creating alerts chapter. After you have created and saved an alert, a link to it will automatically be added in the Message field:

Click Send  to send the text message.
Message log
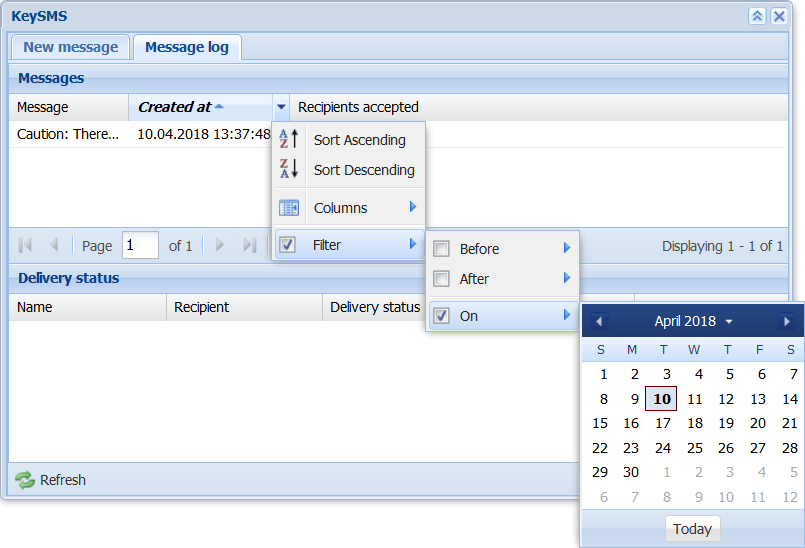
Information on sent text messages will be displayed on the Message log tab of the KeySMS form. Click a single message in the Messages section of the tab view to view the detailed delivery information in the Delivery status table at the bottom of the tab. Click a row with the right mouse button and select Open selected on SMS form  to open the selected rows on a New message form. You can then send a new message using the contact details you selected.
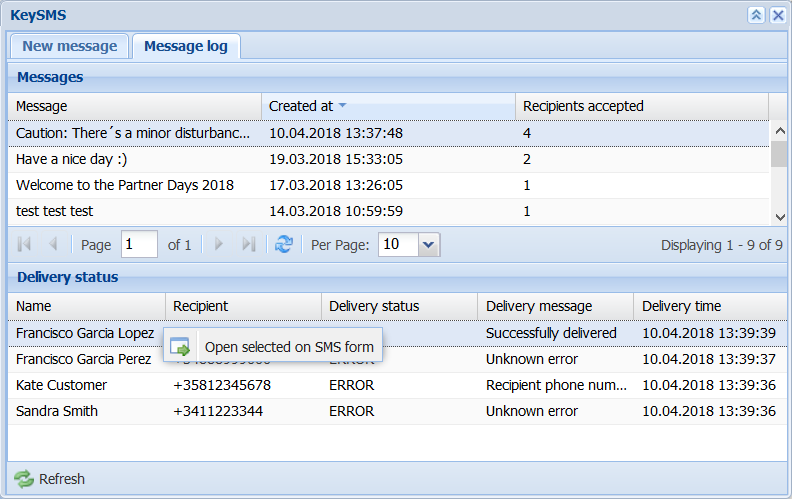
Add or delete columns to edit the log view. In addition, you can use filtering criteria to filter the displayed information based on the requester, message content, creation date or approved recipients.
