The Automatic route search tool provides an automated method for finding optimal routes between network objects. It supports two different networks:
- Logical – for device/circuit-level routes.
- Physical – for conduit, cable, and fiber-level topology routes.
Automatic route search (Logical)
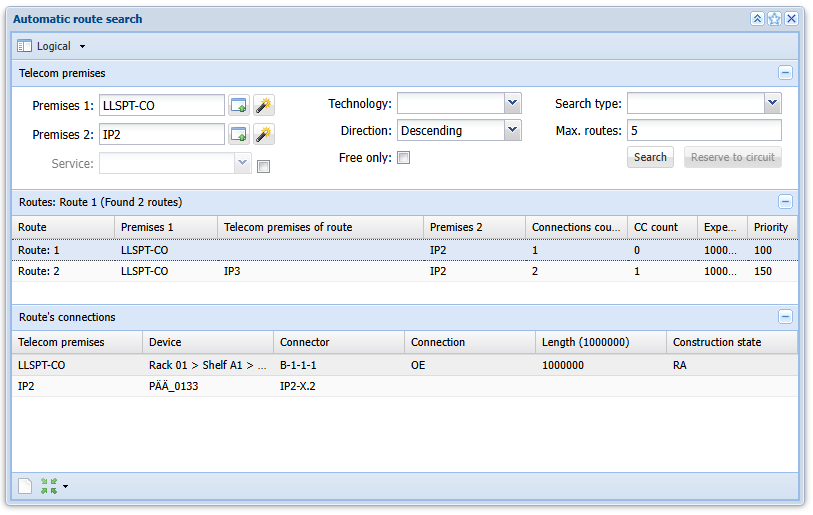
The Automatic route searchfor logical network is used only when there is a need to know the shortest possible reserved or free route including logical connections between two telecom premises. Information on the telecom premises at the start and end of the route is required for the search. If no route between the selected telecom premises can be found, the application notifies the user.
Searching a route
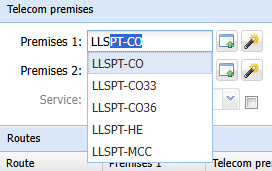
Information on the telecom premises at the start (Premises 1) and end (Premises 2) of the route is required for the search. You can select telecom premises by using one of the following methods:
- Click Pick from telecom premises form
 .
. - Use the Pick from map
 function.
 - Search by using the identifier. When you enter a part of the searched identifier in the applicable text field, a list of search results appears below the field. Select the required identifier using the left mouse button.
The Service selection defines the services provided by the connectors of devices that are accepted and part of the route. Services are viewed from the customers direction to the exchange. If the Service checkbox is not selected, the service offered by the connectors is not taken into account when searching for the shortest route.
The Technology selection defines the technology of devices that are accepted and part of the route. If Technology has not been selected, the technology of the devices is not taken into account when searching for the shortest route.
The Direction selection defines the direction of the EXT connections of the devices that are accepted and part of the route. If direction has not been chosen, or if direction information has not been saved for connections, the direction of the connection is not taken into account.
The Free only selection limits the search to connection chains between the telecom premises 1 and 2 that are free from circuits.
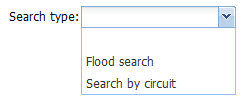
Before searching for routes, you can limit the search by defining filters. You can do this by selecting the Search type. This field is empty by default (meaning a full search is carried out). The actual filters are Flood search and Search by circuit. Flood search searches for all routes with complete connections, meaning the route includes all required external connections and cross connections. Search by circuit searches for all routes with circuits between the premises and tries to find the connections using the same route as the circuit(s) found. Full search (nothing selected in the menu) searches for routes using both methods.
You can limit the number of displayed search results (routes) by defining the appropriate number in the Max. routes field. The default value in the field is 20, and if no value has been defined, all routes found based on the search criteria and filter are displayed on the form.
Starting the logical route search
Click the Search button on the form to start automatic route search. Route search is carried out based on the selected telecom premises and using the defined filters. If the capacity of the end premises (Premises 2 on the form) is smaller than that of the start premises (Premises 1 on the form), the direction is automatically reversed so that it is from the premises with smaller capacity to the premises with larger capacity. In the case of Premises 1 and Premises 2 are switched on the form, and the switch is also applied to the direction of the displayed routes.
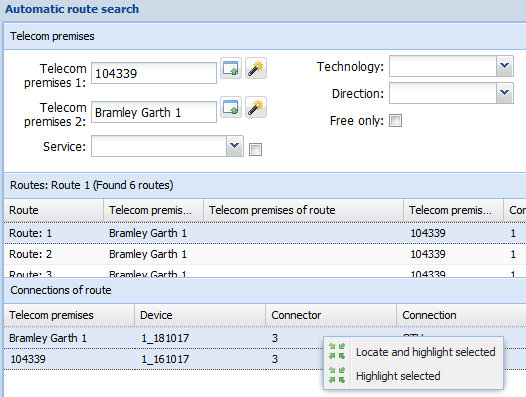
When a search has been successfully carried out, the application displays information on the start and end premises for the route and the telecom premises between them that are part of the route. In addition, the number of connections and cross-connections required for forming the route is displayed on the form, along with the related costs and priority.
If the search returns no routes for the selected telecom premises, the application will notify the user.

Highlighting a route
You can highlight a route in the network map. To do this, click Locate and highlight on the form. This highlights all cable routes related to the connectors that are part of the connection route. You can also right-click the route row to access the locate and highlight functions.
To highlight a specific route with its connections, select the required route option in the Routes section on the form. Next, in the Route's connections section, select the required rows with the left mouse button while holding down the Ctrl key, and, with the right mouse button, select Locate and highlight selected or Highlight selected in the menu.
Note! The Route's connections section lists the devices in a hierarchical order. This means that the host device is the first device listed on the row, with the sub-device(s) shown next, depending on the connections found by the automatic search.
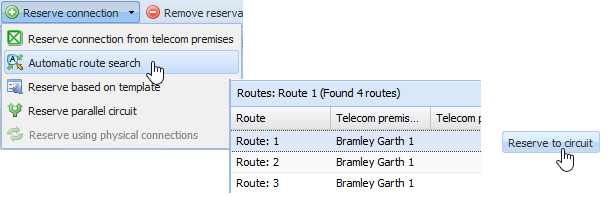
Reserve to circuit
The routes of the search results can be reserved for the circuit that is being edited if you start the Automatic route search from the Circuit form. You can find the function in the drop-down menu for Reserve connection
 . After a successful route search, a Reserve to circuit button appears on the Automatic route searchform. Select the appropriate route option and click Reserve to circuit
 .
.
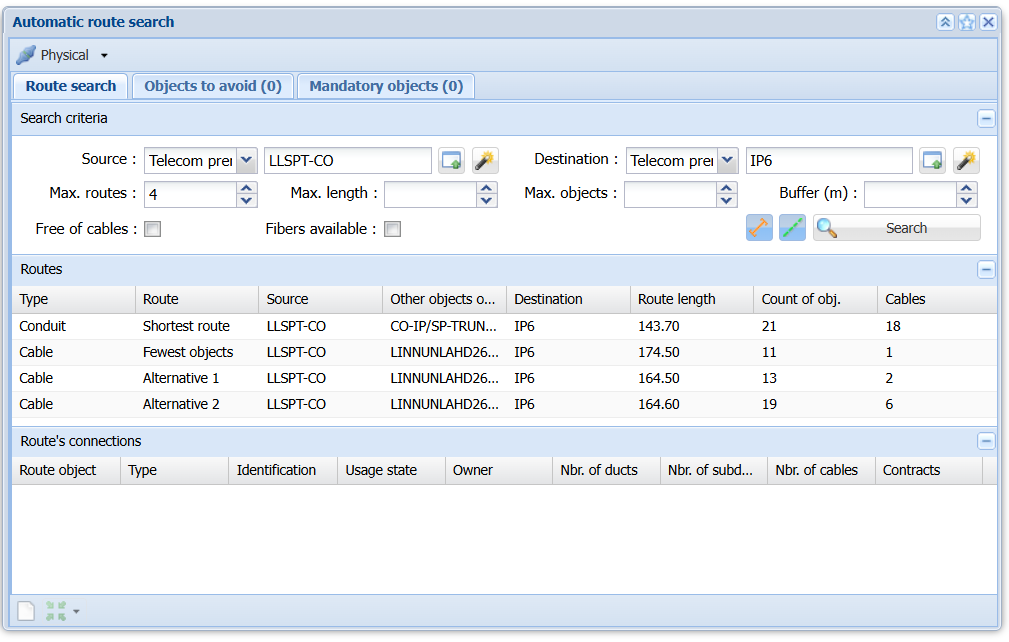
Automatic route search (Physical)
The Automatic route searchfor physical network is used when there is a need to know the shortest possible connectable route or route with the fewest objects including physical connections between two network objects (telecom premises, manhole or splice).
Searching a route
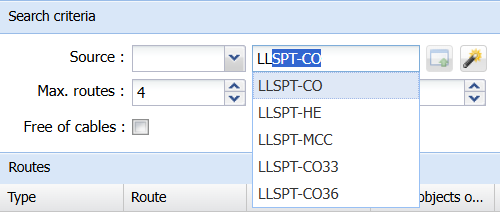
To run the route search, you must first specify the Source and Destination objects. These may be telecom premises, manholes, or splices. The objects can be selected using one of the following methods:
- Click Pick source from form.
- Use the Pick from mapfunction.
- Search by using the identifier. When you enter a part of the searched identifier in the applicable text field, a list of search results appears below the field. Select the required identifier using the left mouse button.
Search criteria
Additionally, you can define search criteria and how physical topology routes are searched.
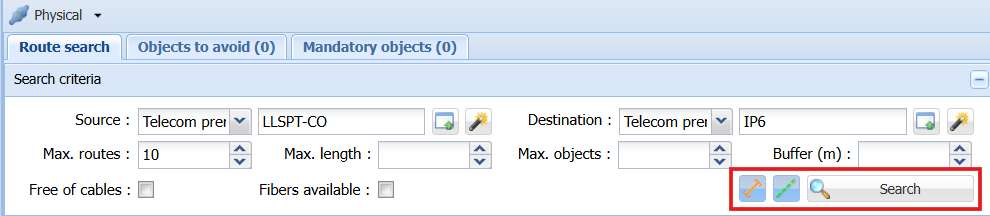
- Max. routes: You can limit the number of searched routes by defining the appropriate number in the Max. routes field. If no value has been defined, all routes found based on the search criteria and filter are displayed on the form.
- Max. objects: You can limit the number of searched objects by defining the appropriate number in the Max. objects field. If no value has been defined, all objects found based on the search criteria and filter are displayed on the form.
- Max. length: You can limit the maximum length of searched routes by defining the appropriate number in meters in the Max. length field. If no value has been defined, all routes found based on the search criteria and filter are displayed on the form.
- Buffer (m): You can create a buffer area to limit which objects are included in the search between Source and Destination.
- Free of cables: When selected, only routes that contain no cables are returned. Can be used in situations where one wants to find topologically connected duct routes that do not contain cables.
- Fibers available: When selected, the search returns only routes that include at least one available fiber. Can be used in situations where one wants to find topologically connected cable routes that have fibers available/free from physical reservations.
- Show search radius: When selected, a search radius is displayed on the map to visualize the route search algorithm after the Search
 has been run.
Starting the physical route search
After selecting the Source and Destination objects with the appropriate search criteria, click Searchto run the route search. If needed, you may exclude conduits or cables from the end results by switching off the corresponding Conduit or Cable
 icons.
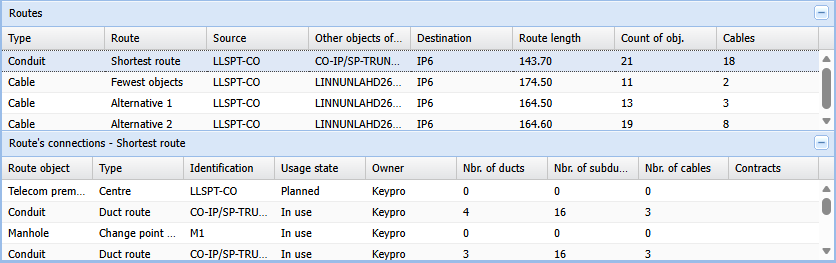
When a search has been successfully carried out, it lists several route options in the Routes section; the shortest route, the route with the fewest connected objects, and other valid alternative routes.
Note! The shortest route and the route with the fewest objects may be the same, but the system still reports them as separate options for clarity.
Clicking any of these routes lists the connected objects in the Route's connections section.
To start a new search, edit the Source and Destination objects or clear the form by clicking Clear .
.
Highlighting a route
You can highlight routes in the network map:
- To highlight all routes that are part of the route's connections, click Locate and highlighton the form's toolbar.
- To highlight a specific route with its connections, select the required route option in the Routes section on the form. Next, in the Route's connections section, select the required row with the left mouse button, and with the right mouse button select Locate and highlight selectedor Highlight selected.
Note! The Route's connections section lists the devices in a hierarchical order based on the type of route has been selected.
Objects to avoid
The Objects to avoid tab allows you to define network objects that must be excluded from the route search. Any object added to this list will prevent the route from passing through it, prompting the system to find an alternative path.

The objects can be selected using one of the following methods:
- Click Pick from form.
- Use the Pick from mapfunction.
- Search by using the identifier. When you enter a part of the searched identifier in the applicable text field, a list of search results appears in a drop-down menu below the field. Select the required identifier from the drop-down menu and add it to the Objects to avoid list by clicking Add to list
 .
.
Additional functions can be opened from the drop-down:
- To remove an object from the list, right‑click the entry and choose Delete
 .
. - To locate selected object from the list, right click the entry and choose Locate selected
 .
. - To highlight selected object from the list, right click the entry and choose Highlight selected
 .
. - To locate and highlight selected object from the list, right click the entry and choose Locate and highlight selected
 .
.
Mandatory objects
The Mandatory objects tab allows you to define network objects that must be included in the route. Any object added to this list ensures that only routes containing all mandatory objects are shown in the results.

The objects can be selected using one of the following methods:
- Click Pick from form.
- Use the Pick from mapfunction.
- Search by using the identifier. When you enter a part of the searched identifier in the applicable text field, a list of search results appears in a drop-down menu below the field. Select the required identifier from the drop-down menu and add it to the Mandatory objects list by clicking Add to list.
Additional functions can be opened from the drop-down:
- To remove an object from the list, right‑click the entry and choose Delete.
- To locate selected object from the list, right click the entry and choose Locate selected.
- To highlight selected object from the list, right click the entry and choose Highlight selected.
- To locate and highlight selected object from the list, right click the entry and choose Locate and highlight selected.