KeyCom tools |
|

Object types
Telecommunication networks consist of point objects, line objects, area objects, and other objects. You can use the following buttons to open the object forms for managing point objects:
Telecom premises
Device
Splice
Pole
Manhole
Point object
You can use the following buttons to open the object forms for managing line objects:
Cable
Conduit
Duct
Area objects include:
Service area
Exchange/Telecom area
Other objects include:
Radio link
Route follower
AB measurement
Connections management
The functions and information content on the forms are the same, meaning that objects are handled in the same way, but the object form is different for each object. Depending on your user privileges, you can, for example, search for objects based on search criteria, modify their location and property values, and locate them on the map. The button functions related to forms used for managing objects are introduced in the chapter Buttons on object forms. Some object forms include buttons that have functions not available on other forms. These functions are introduced in this chapter after providing instructions applicable to all forms.
Property attributes
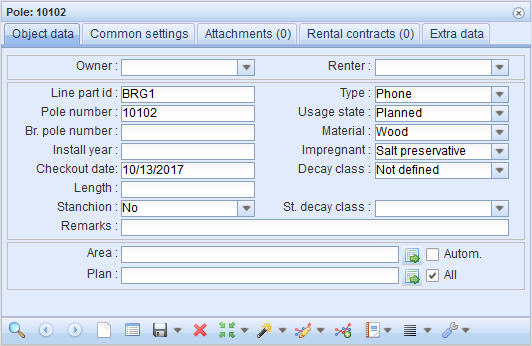
The main difference between various forms is the data that is entered on them. For poles, for example, you can add information on the impregnation method and decay class. Regardless of the applicable type and object form, objects have similar property attributes. Such information is related to the object owner, its properties, location, area, and plan.
The information content of forms for service areas and point type objects is less extensive than the content of other forms. On the Service area form, you can create and view service areas, while the form for point objects can be used, for example, for handling traffic signs.
If you want to create a new object, Type and Usage state are usually mandatory fields. The system can automatically create an identifier for new objects if this feature has been activated in the system settings. For cables, the mandatory fields are Installation type, Usage state, and Type. When you create a new cable, information on its length and measurement method are automatically updated in addition to the identifier.
After entering the mandatory data, click Create to create the object on the map. When the object was created successfully, the following text is displayed at the bottom of the form: Saved successfully. You can then update other property values for the object and save them in the system by clicking Save form
 .
.
The property values that can be defined vary depending on the object. For example, you can enter information on a pole’s stanchion and material. You can enter the following information for all objects: owner, renter, and installation year. In addition, you can freely include text in the extra data section.
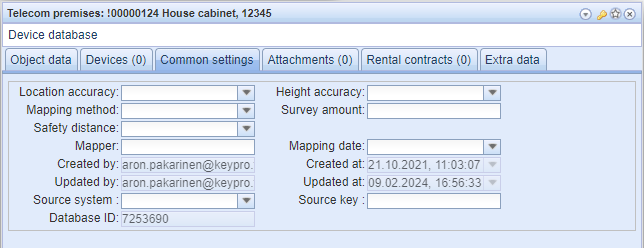
The Common settings tab is the same for all objects. On this tab, you can enter information on mapping and its accuracy, in addition to which the tab includes fields for the mapper and the person who updated the data. This information is automatically saved in the system, and it cannot be edited.
Rental contracts
The Rental contracts tab is used for handling rental agreements related to the object. If the object on the form has been connected to a rental contract, the number of contracts is displayed in parenthesis after the name of the tab. More information on Rental contracts can be found in the chapter Rental contract.
The form includes a list of rental contracts. To open a Rental Contract form with the required contract information, select the contract using the right mouse button and click Open contract .
.
Property attributes that can be defined freely (Extra data)
You can define free-form property attributes for the following forms: cable, conduit, telecom premises, pole, manhole, splice, point object, exchange/telecom area, service area, and plan. If free-from property attributes have been defined, they can be viewed on the Extra data tab of the object forms.

You can use free-form property attributes when searching for objects, and they can also be included in the List function and the related report.
The admin user of the system can freely define the free-form property attributes, name them, and select their data type (such as text, figure, and date). The admin user can also add fields marked as set to Read only. Such fields cannot be viewed by other users.
Attached documents
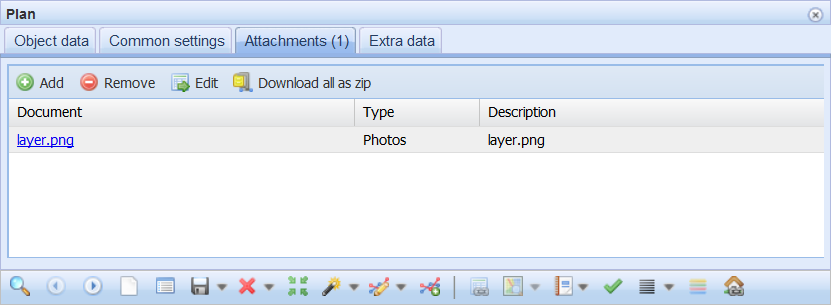
On the object form’s Attachments tab, you can view documents attached to the object. The header of the tab indicates the number of attached documents for the object. The attachments can be files or URL links, and they are listed based on type. If the object form does not have any external documents, the Attachments tab includes no information.
Viewing attached documents
Click the name of an attached document to open it for viewing. If the attachment is a URL link, it is opened on a new tab in your browser. For files, the functions depend on your browser and browser settings. Usually, the browser asks by default whether you want to save or open the file.
Select Download all as zip to download all attachments to your device.
Editing the information in attachments
- On the list, select the attachment you want to edit.
- Click Edit
 to open the information on the attachment on the External documents
 form (see External documents).
 - Edit information.
- On the External documents
 form, click Save form
 to save your changes.
Note! The information included in the attachment is updated on the Attachments tab only when the object form data is reloaded.
Adding an attachment
- Click Add
 to open the External documents form (see External documents).
 - Choose a document or add a new one (see Adding external documents).
- Click Attach document
 .
. - If you want to attach more than one file, go to the drop-down menu for Attach document
 and select Attach selected documents.
TIP: If the document you want to attach has no location, you will be asked whether you want to use the same location as the object you want to attach it to.
Removing an attachment
- On the list, select the attachment you want to remove.
- Click Remove
 .
.
The attachment is removed from the object in question, but the document is not completely deleted. You can retrieve it and delete it from the system using the External documents form (see Deleting an external document)