In KeyAqua, network objects create a network model and are thus used as the basis for the entire production process throughout its various phases, from network construction to fault repair and renovation.
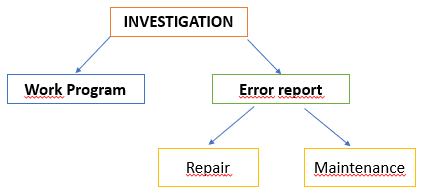
The maintenance function can be roughly divided into the following functions:
- Error reports that can be associated with:
- Repair measures
- Maintenance measures
- Work programs that can be related to:
- Repair measures
- Maintenance measures
- Investigations
- State reports for water network nodes
- Quality reclamations
- State investigation for manholes
All of the above-mentioned functions include a function that allows you to add electronic attachments (files and links) to all objects. The objects related to maintenance functions can be highlighted or displayed on the map as themes, and various reports can be generated for them.
Error report
The Error report  form is used to process various malfunctions and customer notifications that are logged in the system for possible further action. These reports can also be used as material when considering the overall condition of the network and possible repair and renovation measures.
A notification can be linked to a network object (duct, node tool or customer point), or it can be given a location on the map (linking to coordinates).
On the basis of the notification, the supervisory staff will investigate and decide whether the repair of the fault is the responsibility of the water and sanitation services. For example, service connections that housing companies are responsible for do not necessarily cause any actions to be taken. Although the correction of a disturbance is not the responsibility of the water and sanitation service company, the entry will remain in the system and it will be retained as history data in the system.
Error reports include status information that indicates whether the error report is still valid. All error reports will be retained after repair, so that they can later be viewed and included in the reporting. When planning maintenance and renovation operations, information on areas in which there have been, for example, several leaks and/or various faults is valuable information for the planning.
Click Error report  to open the Error report form. You can retrieve reports from the database using search criteria, update the data in the reports, and locate them on the map.
To create a new error report, enter the property values on the form and then click Save form  to save the report. Error reports can be used to save information related to the error report and malfunction type and quality.
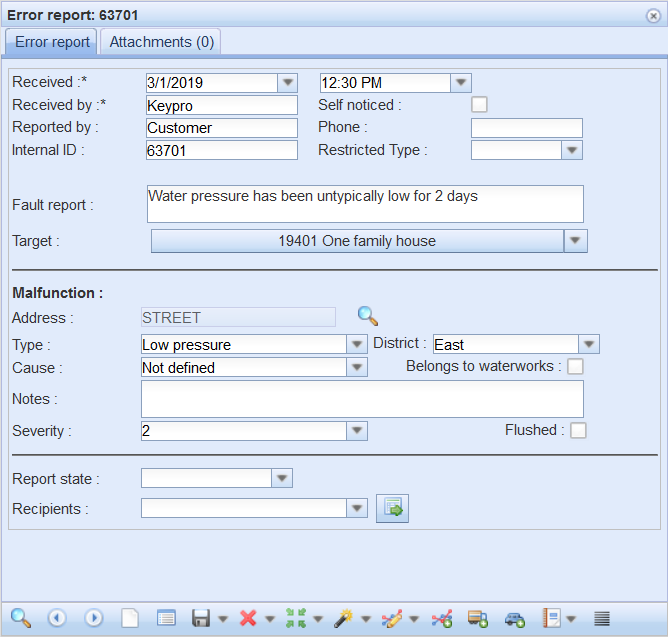
To link an error report to a network object (ducts and nodes for all networks), go to the drop-down menu for Target and select Connect target. On the map, click the object you want to connect with the left mouse button. The error report will be assigned a location either when you save the information or later with the Create  function. The
  symbol indicates the location of the error report. The location can be changed using the Modify
  function.
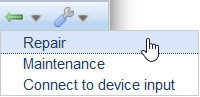
Tip! You can link either a repair or maintenance measure to an error report; only one repair measure or one maintenance measure, not both. If necessary, the object can be linked to a work program.
The colour of the error report icon displayed on the map depends on the status of the error report:
Yellow – the error report has been received but it has not yet been investigated whether the defect must be repaired by the water supply service company.
Pink – the water supply service company is responsible for the repair, but no repair or maintenance measures have yet been documented.
Green – the fault has been repaired or maintenance measures have been taken.
Repair measures usually require digging, such as in the case of leaking water ducts and collapsed sewer lines.
Maintenance measures include, for example, flushing of water ducts, opening of blocked sewers, and replacing manhole lids.
Based on the information in the error report, you can attach the object to a work program, such as a periodic flushing or the removal of tree roots. Incidents related to network objects are stored in the database, and users can view the incidents related to network objects (described in the chapter Events).
Sending error reports by email
Error reports can be sent by email to other users of the system so that they are immediately informed of the fault. The error report email contains a link that automatically opens the system and the error report form with the correct information (requires system log-in). To select more than one recipient for the error report from the Recipients list, click the names with the left mouse button while holding down the Control key. When you have selected the recipients, click outside the form to have the selected recipients displayed in the field in italics. To send the error report to the recipients by email, click Send  .
.

Maintenance
Maintenance  measures include, for example, flushing of water ducts, opening of blocked sewers, and replacing manhole lids.
To add a maintenance measure to an Error report  , click Maintenance
  on the form. This will open the Maintenance form. In the top section of the Maintenance form, you can see information on the error report that the maintenance measure is associated with and information on the network object to which the fault report has been linked. The form will be populated with information on the measures taken, the responsible person, and other details. When the form has been completed, click Save form
  to save the information.
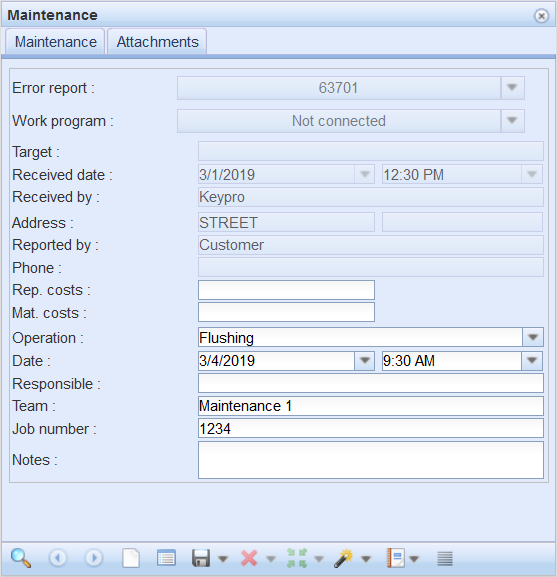
When you re-open the Error report form to which the Maintenance measure was linked, the Repair  button with its related functions is deactivated on the form. This means that a maintenance operation has already been linked to the error report, and it is not possible to add a repair measure. To view the saved information on maintenance measures, click Maintenance
  .
.
Alternatively, you can open the Maintenance  form from the drop-down menu for Reports in the KeyAqua toolbar. You can retrieve maintenance measures to a form using the form fields. To open an error report related to the maintenance measure, click Open in the drop-down menu for Error report.
Repair
Compared to maintenance, repairs are more extensive measures taken in relation to a problem reported on an error report. To link a repair to an error report, click Repair  on the Error report form.
The Basic information tab includes summaries of the error report information (in the top section) and the repair measure (at the bottom). The central part of the form can be used to save additional information, the job number, and cost information.
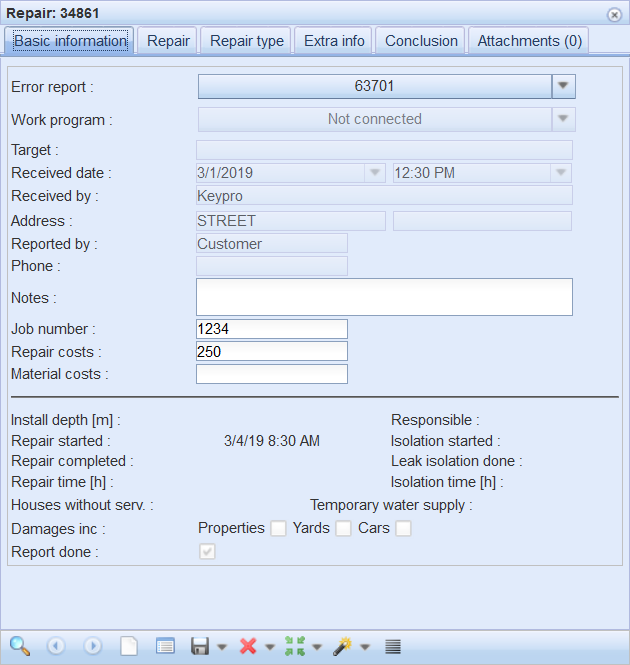
Information on the persons carrying out the repair work (responsible person and team), the start and end time of the repair, and a free-form description of the repair measures are saved on the Repair tab. In addition, information on the repair, such as the location, repair surface, fill ground, and repair base, is recorded on the tab. This can be useful when planning repairs for this duct section in the future.
Information about repair methods, such as the new duct material, duct junction, leak node (if any), precipitation and its quality, and the flushing of the line, is saved on the Repair type tab.
Details on the duct leak, such as a description of the leak (hole, crack, piece missing, cut) and the leaking element, leak cause, leak area, interruption in the water supply, the duration of the interruption, and repair type are saved on the Extra info tab. The Conclusion tab is used to save free-form information on the report creator and damage to facilities, yards, and vehicles. The due date for the Repair report can be defined and its sign-off can be completed on this tab. The Attachments tab is used to add documents (if any) related to the repair measures.
Adding maintenance/repair measures directly to an object
It is possible to add maintenance and repair measures to an object without having to create an error report or work program (see the Work Programs section for further information). This function is useful, for example, for planning and documenting the maintenance of individual node tools. To add a measure to a node tool-specific object form, select Maintenance or Repair from the drop-down menu for Take to work program  or Other tools
  . This opens a form for the selected measure with pre-filled object information.
Failure report
Failure report  form allows you to record information about the observed damage. A damaged network element can be, for example, a pipe, which can cause a leak. You can connect the failure report to the error report. On the Reason tab, you can provide detailed findings and the general and specific cause of the damage. On the Statistics tab, you can write down information related to repairs and procedures.
Investigation
The Investigation  form can be opened from the drop-down menu for the KeyAqua
  reporting tools. The Investigation
  carried out on the network objects is categorised as maintenance, renovation, warranty and acceptance investigations. The option Undefined is also available. Admin users can add new investigation categories to the system, such as maintenance and renovation, as well as sub-categories for them (such as state investigations).
The various investigation methods may include:
- Visual investigation (sensory perceptions related to the condition)
- Camera surveys
- Sampling
- Leak listening
- Pressure tests
Network objects and customer points can be freely linked to an investigation. The network objects related to the investigation can be highlighted on the map. Users can attach various documents to investigations.
As a result of an investigation or inspection carried out on a network object, users can link the investigated object to a work program (maintenance, repair or renovation program) or, at the user’s discretion, create an error report in the system and link the object to it. As a result of this, fault repair will proceed in accordance with the error report process.
In the figure below, the investigation processes.
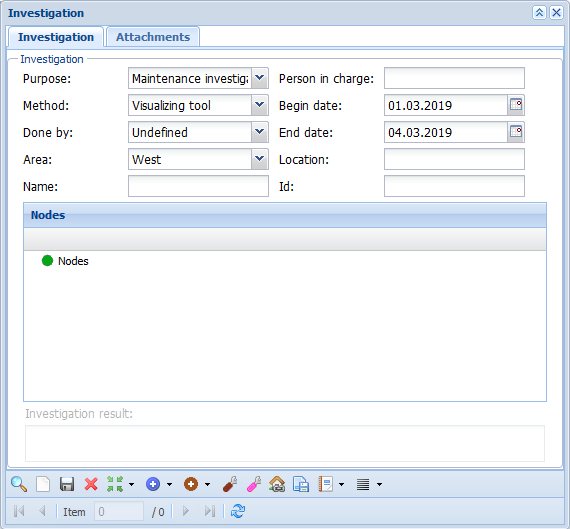
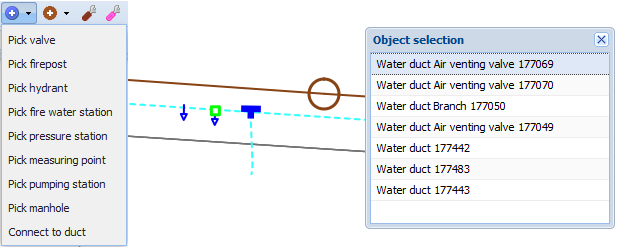
You can add network objects to an investigation with the Add buttons at the bottom of the form:  Water network node or
  Sewer network node. There are two ways to add nodes:
- Click Add water network node
 or Add sewer network node
  . On the map, click on the object you want to add to the investigation and select it from the list if there are multiple network objects in the location you are pointing at.
Or:
- Alternatively, open the object form from the drop-down menu for the Add buttons. To retrieve the correct object to the form, either
 use the search functions or
  pick the object from the map. To add the correct object to the Investigation form, click Take to investigation
  .
.
In the example figure below, on the left, using retrieval to a form (drop-down menu functions) and, on the right, selecting the object on the map using the Add water network node function.
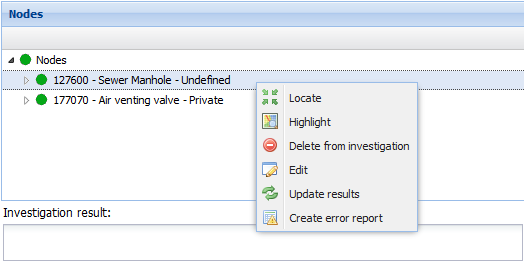
Once the item has been added to the Investigation form, it will appear in the list of Nodes. Select the correct line in the list of nodes and click the right mouse button to open a menu with options. You can locate  and highlight
  an object on the map or delete
  an object from the investigation.
The Edit  function opens the object form, while the Update results
  function saves text in the Investigation result field. First, enter text in the Investigation result field, and then click the Update results button and Save.
Use the Create error report  function to create an error report with the object’s information.
Download WinCan
Use the Download WinCan  function to create a text file in WinCan format for a CCTV survey of the investigation objects. The CCTV software can read the WinCan text file, which includes basic information on the manhole distances to be surveyed with a camera.
State report for water network nodes
To open the form for creating state reports, click State report  .
.
The Common tab on the form includes general information on the water network object on the form. Mandatory fields include Date, Technicians, Node, and Node class. You can enter text in free form in the Technicians and Notes fields, whereas other information can be completed using drop-down menus. Click Save form  to save the state report information.
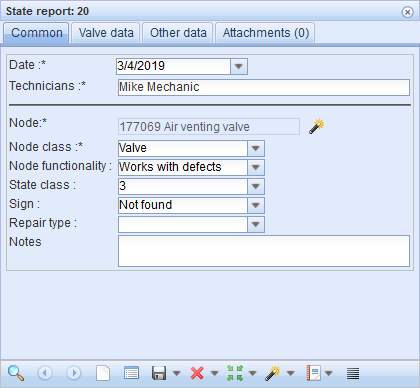
Select the equipment/node by clicking Pick node  in the middle section of the form. Click the correct node on the map with your left mouse button. The ID and type of the node will then be displayed in the Node field. In addition, the location information for the state report will be updated with the location of the node that you add. Click Locate
  to center the map on the object in question.
If the device to be processed with the form is a valve, then the Valve data tab will be completed with additional information on the condition survey. In the case of other nodes, information will be added to the Other data tab. Information on the properties and condition of the node is entered on both the Valve data and Other data tabs.
Work programs
Work programs are created with the Work program  form available under KeyAqua Reports
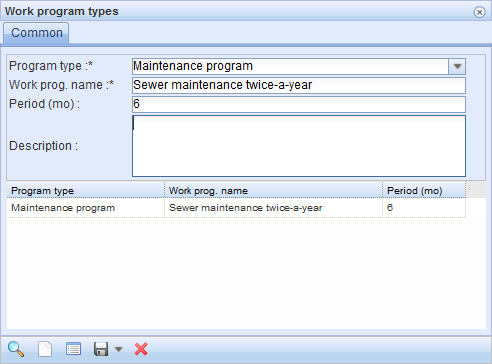
  . The work program form is divided into three parts. The top section of the form includes general information on the work program: a unique ID for the target; Program type, such as maintenance, repair, or renovation program, and more detailed information on the work program (such as flushing on an annual basis). More detailed information, such as details on the flushing, will be displayed in the Description field. The work program data is maintained on a separate Work program types form, on which admin users can add new work program types and work programs to the system. Adding new work program types
  is described in the chapter Adding work program types.
Maintenance programs include, for example, regular flushing and removal of roots. Repair programs refer to network objects awaiting repair but not requiring immediate action. Repair measures may be carried out, for example, in connection with other construction work. Renovation programs are related to network objects awaiting renovation. For example, network objects that will be renovated are added to future renovation programs.
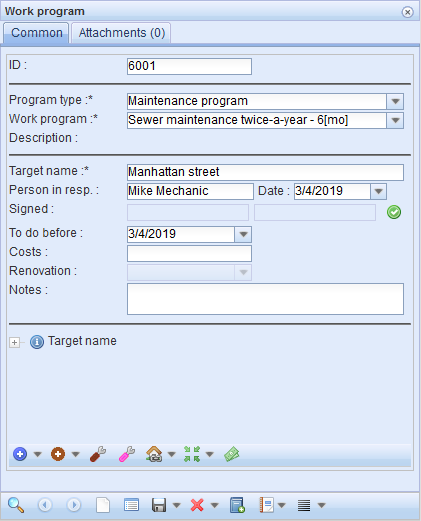
The information in the middle section of the form is usually related to a job that will be carried out in one go. For example, when there are several network objects requiring maintenance across an operating area, they can be grouped appropriately so that the work for each group can be carried out all at once. The name of the target can be, for example, a street name or the name of a particular area.
The middle section also includes fields for completing the name of the responsible person and the date. A To do before date for completing the work can also be defined. A separate Signed  button can be used to confirm that all work has been carried out. With this, all work related to the associated network objects will be marked as completed. Furthermore, the date in the To do before field will be updated for work that is performed at regular intervals, with the new date set in accordance with the interval specified for the work program. For renovation programs, you can store information about the renovation method. In addition, you can provide further details and information on the total costs.
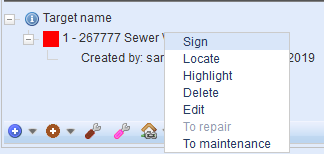
TIP: To confirm the completion of work related to an individual target through the target list, click the correct row with the right mouse button and select Sign.
The bottom of the form contains a list of the network objects added to the work program in question. Network objects are added in a similar manner to adding network elements to an Investigation (see the Investigation chapter).
The target’s sequence number, ID, type, and owner are displayed. To see who added the object and when, and to view the most recent confirmation, click the  icon next to the object’s name. Right-click on the correct line to locate or highlight the object. Click Locate to center the map on the object in question. If you have highlighted all the associated ducts and nodes on the map, you can click Highlight to highlight an individual object so that you can distinguish it from the others. You can delete a target from the work program or click Modify to access the network object form.
In the example figure below, an object added to a work program and the selections related to it. Red colour refers to non-signed target.
You can add repair measures to repair program objects and maintenance measures to maintenance program objects. Repair measures are described in further detail in the chapter Repair and maintenance measures in the chapter Maintenance. If maintenance and repair costs have been saved for the objects’ maintenance and repair measures, the Count costs  function on the form will calculate the total cost of all objects added to the work program. This sum will be displayed on the Work program form in the Costs field. The general buttons on the work program form, such as object browsing, locating, and saving, work in the same way as on any other form.
Adding a work program type
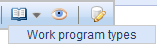
Work programs can be added in the system using the Work program types form. To open the form, go to the toolbar and the drop-down menu for Work program, and select Work program types or click Work program types  on the Work program form.
Quality reclamations
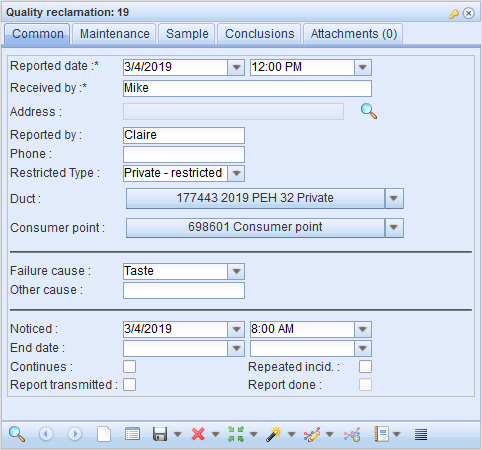
Click Quality reclamation  to open the form for processing quality complaints. Information on the address, issue, discovery, actions, and samples taken and conclusions will be collected on this form.
The Common tab of the form includes general information on the quality reclamation, such as who reported it, what the cause of the complaint is, and when the observation was made. Reported date and Received by are mandatory fields. Quality reclamations can be linked to ducts, such as service lines, by selecting Connect to duct in the menu for the Duct field. This will link a specific part of the network to the quality reclamation. For example, the address of the person filing the quality reclamation can be saved using the Search  button. The address is retrieved from the address register using the Address form that is displayed. This is done either by using the form's search criteria or by pointing at the address on the map (the address layer must be active).
You can specify a Consumer point for the quality reclamation. In the menu for Consumer point, select Connect to consumer point. Select a consumer point on the map. Please note that the Consumer point layer must be active in Layers.
You can add the cause of the complaint, document other causes and observations, and add information related to the report’s status, time, and dates.
Location information can be added to quality reclamations using the Create  function. This also creates a geometry and an icon, which can be located and highlighted using the Locate
  function on the form.
The Maintenance tab is used to record the visit time, the flushing procedures and methods that the customer has performed, and flushing-related information related to the reclamation. The tab can be used to save the meter reading before and after the flushing, and information on whether the customer will be compensated for the water used for the flushing.
Sampling-related information is recorded on the Sample tab. The Conclusions tab is used to record conclusions on the cause of the disturbance and the date on which feedback has been sent to the customer, in addition to which information related to returning the report is recorded on this tab.
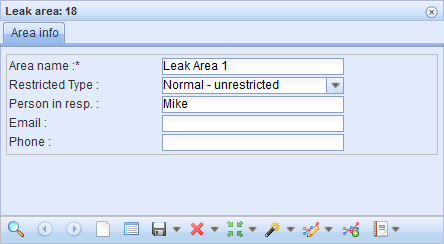
Leak areas
Use the Leak area  function to provide area information that partly determines who is responsible for the faults and repairs in the area in question. There can be an unlimited number of areas.
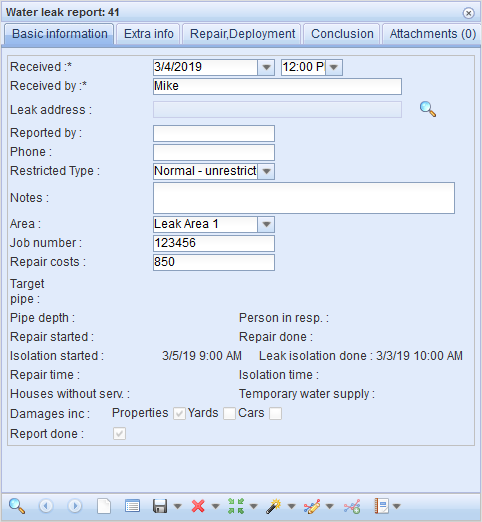
Water leak report
The Water leak report  tool is used to save detailed information on leaks in water ducts and the related repairs and further actions.
- Basic information: includes, for example, the name of the person who received the information and the time of receiving it, leak area, the name of the person who reported it, the job number, costs, repair time, and the time the report was completed.
- Extra info: includes, for example, a description of the leak area, information on the leaking element, the cause of the leak, and the repair area.
- Repair, Deployment: includes, for example, information on the person and team responsible for the repair, repair time, isolation, temporary water supply, repair method, precipitation, and flushing.
- Conclusion: includes, for example, information on damage to buildings, yards, and vehicles, and the author of the report.
- The Attachments tab can be used to attach images and documents related to the water leak report.
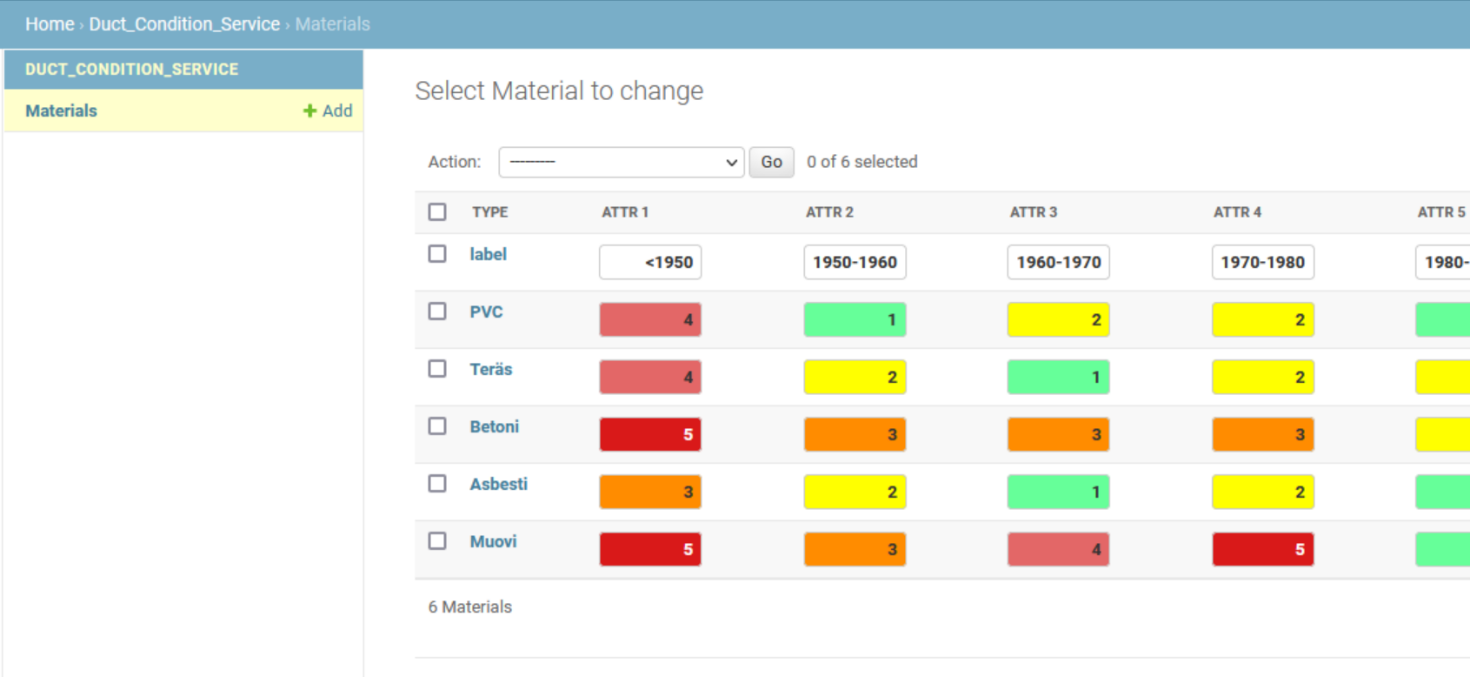
Duct condition information (this function is subject to a separate order)
The Duct condition information tool is used to document the condition values of the ducts. It is a service that allows the tenant/customer to edit their own assessment of the condition of the ducts in the admin user interface. The estimated condition of a particular duct is based on its material and year of installation. For example, a PVC duct installed in 1980 would receive a certain condition value.
The condition value of the duct gives an idea of when the duct should be repaired or replaced with a new one. Possible CCTV coverage and the values of the Water Balance calculation may provide additional information. The service offers a REST API for querying the values of the interface using the year of installation and the material of the channel as query parameters.