The Rental contract function is available in the KeyNet toolbar. The Rental contractform consists of four tabs: Rental contract, Products & Objects, Contract hierarchy, and Attachments. This chapter introduces the functions on each tab.
Rental contract information
This tab includes information related to a rental contract. You can define a Parent contract, the Lessor, and the Lessee. These items are different from the other information content of the form in that they always refer to some other object. These are introduced in the next sections.
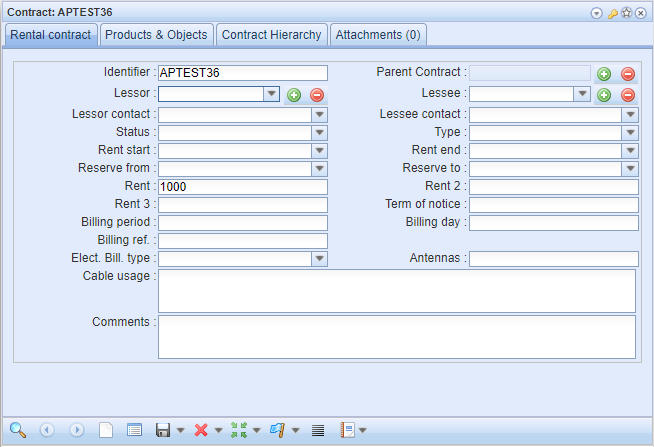
To create a new rental contract, complete the only mandatory field on the form which is Identifier. Save the form. Add new objects on the Products & Objects tab. On the Contract hierarchy tab, you can browse through objects that are related to the contract hierarchy.
Adding a parent contract
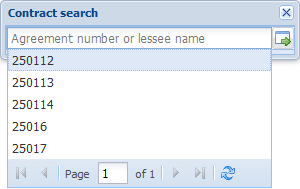
Click Upper Level Contract to activate the contract search function. The Contract search dialogue box is opened. In the text field, enter a part of the contract number you want to search. When you start typing, filtering is activated automatically, and a list of search results is displayed. Select the appropriate rental contract on the list with the left mouse button. You can then click Add this as parent contract
 to import the search result to the Rental contract form. The contract you selected appears in the Parent contract field.
In the example figure below, the number “12” has been entered in the contract search field. The contract search function will find all contracts with the number sequence “12” included in the agreement number.
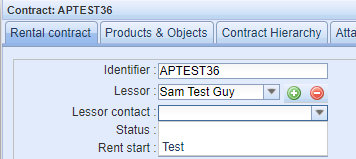
Adding a lessor
Click Lessor to open the Customer form, on which you can create, edit, and delete lessors. Open the required lessor on the form, or create a new one, and click Update to form
 to complete the Lessor field. You can search existing lessors by typing in the name in the field.
Once you have defined the lessor for the rental contract, you can go to the Lessor contact field and select a contact person that has been linked to the lessor (customer).
Adding a lessee
Click Lessee to open the Customer
 form, on which you must open the appropriate customer, and click Update to form
 to complete the Lessee field. You can search existing lessees by typing in the name in the field.
As is the case with lessors, you can also select a contact person for lessees in the Lessee contact menu if contacts have been defined for the lessee on the Customerform.
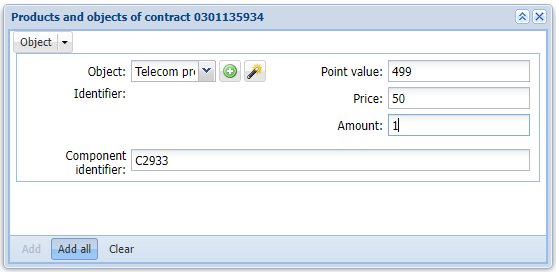
Products & Objects
On the Products & Objects tab, you can browse, add, locate and remove objects attached to the rental contract. This tab includes an object list and the Attach new object button that opens the Attaching of products and objects form.
Products are objects that you cannot create for the rental contract through other forms. To add a product, select Product in the drop-down menu.

You can filter the products in the Product menu by selecting the Product class and Product type before you open the Product menu. You can also fill in the following fields: Point value, Price, Amount, and Component identifier. Click Add. Once you have added a Product, it appears on the rental contract’s Products & Objects field.
When you add an object or multiple objects, KeyCom objects that have already been digitized in the system are attached to the rental contract. Start by selecting an object in the drop-down menu for Object. Then decide how you want to attach the object. There are three ways:
- Click Open target form
 to open the required object on the form that is opened and click Update to form
 .
. - Use the Pick from map
 tool. On the map, define the area that includes the required object. When you have selected the object, the object’s identifier appears in the Identifier field. Then click Add to add the object to the rental contract.
 - Add multiple objects at once. First, click the Add all button to activate the functionality. Proceed as described in the example A and click the Open target form
 button to open the required objects. Open the dropdown menu linked to the Update to form
 and click Export all to form. The objects that were selected on the form will be transferred to the Products & Objects list.
Note! After the object has been added, the rental contract is displayed on the Rental contracts tab of the object in question, such as telecom premises.
The functions of the object list:
View the functions of an object on the object list by right-clicking the row in question. The functions include: Edit, Open target, and Delete. Click Edit to edit the object on the Attaching of products and objects form. Open target opens the form for the object in question. Delete removes the row from the object list, and the object is no longer attached to the rental contract in question. You can also delete multiple objects at once select the required rows while holding down the Control or Shift key. Then click Delete
 , like normally.
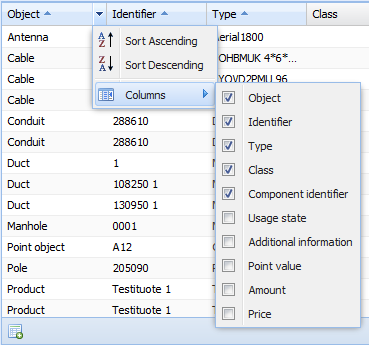
You can modify the Products & Objects columns by positioning the mouse cursor over a column header. This activates the menu. The Columns option displays a menu with functions for viewing and hiding columns. The menu is the same for all headers.
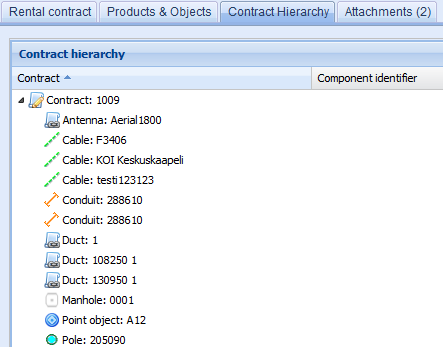
Contract hierarchy
On the Contract hierarchy tab, you can view contracts, the relationships between them, and the objects they include. You need this tab to view the relationship between the contract on the form and other contracts.
Click the right mouse button to view the options available for the list objects. These options include:Open target and Delete
 . Deleting deletes the object from the rental contract in question without deleting the object from the map or database.
Attachments to the rental contract
You can add attachments to a rental contract on the Attachments tab.
More information on adding and managing attachments is provided in the chapter Attached documents.
Rental contract reports
You can create reports on a rental contract. In the drop-down menu for Export , select Reports and then select the appropriate report:
Rental contract – report: You can create and print a PDF or Excel file that includes information on the rental contract and the attached objects.
Contract objects – report: This creates an Excel file that lists all the objects attached to the rental contract on the form.