The Modeling form is divided into the following sections:
- Modeling data:
- List of network objects sent for modeling and the functions related to the process:
- Form buttons (tools):

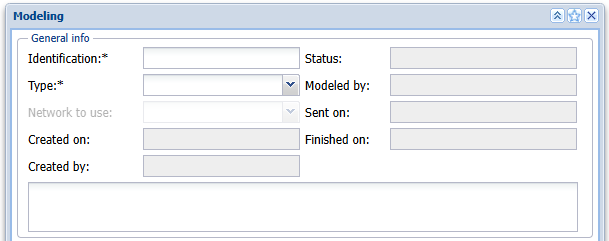
Basic modeling data
The creation of a new model starts with the completion of general information in the top section of the Modelingform:
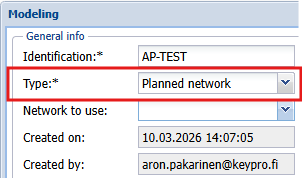
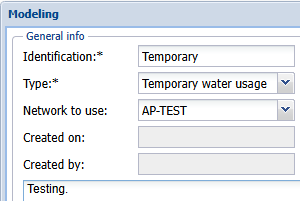
- Identification: The ID given by the user.
- Type: Select the applicable type for the modeling from the available options in the list:
- Constructed network: For modeling the entire constructed network.
- Planned network: For modeling a plan that is related to an constructed.
- Temporary water usage: For modeling temporary water usage.
- Quality: For modeling the age of water (retention) and the origin of the water (the water source from which the water enters the network node).
- Use the text box at the bottom of the General info section to provide a more detailed description of the object that is to be modeled.
- Click Save
 to save the data. The Created at and the Created by fields are then automatically completed.
The columns on the right will be completed during the modeling:
- Status: The status of the modeling:
- Sending modeling request
- Modeling in progress
- Retrieving modeling results
- Modeling complete
- Sending failed
- Modeled by: The user ID of the person who created the model
- Sent on: The date and time when the data was sent for modeling.
- Finished on: The date and time for completing the modeling so that the results are available In KeyAqua.
- The Network to use field displayed in grey is activated when the type of modeling is other than the modeling of an constructed network.
The modeling function enables the modeling of several constructed networks. This is useful, for example, in cases where you want to have one model match the constructed network and, in another model, change or remove parts of the model for the constructed network.
When modeling plans, temporary water usage or water quality, select one of the models created for the modeling of temporary water usage in an constructed network. These different modeling cases are described later in this document.
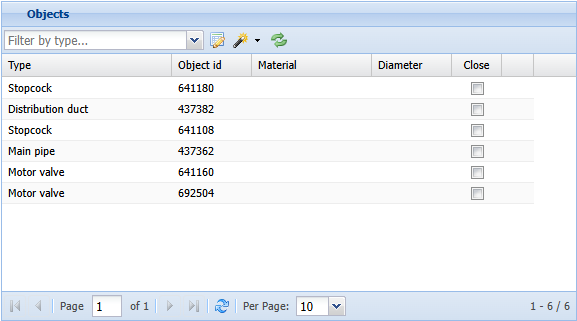
Linking network objects to modeling
The principle for network object linking is that KeyAqua includes information on which network objects are part of the model, and only these are sent to the modeling application through an interface.
The first step is the creation of a model for the constructed network, which is then tested for compatibility with Fluidit.
- The network objects that are required to be included in the modeling are selected for modeling. For example, regarding water ducts, service lines are usually not included in modeling.
- The buttons in the bottom section are used to link network objects to modeling:
- Add water network node
- Add nodes connected to ducts

Click Add water network node to add a single water network node and select the node on the map.
To add more than one node: In the drop-down menu for , select an object form and use the functions of the form to search for a larger number of objects and transfer them all to modeling at one go.
Click Add nodes connected to ducts to add to the model the nodes to which the ducts that were already added to the model have been connected.
Order of adding nodes:
- Add ducts to modeling.
- Add nodes connected to ducts.
- Add consumer points.
Adding an constructed network to modeling is described in more detail below
Modeling of an constructed network
Adding the nodes of an constructed network is discussed next.
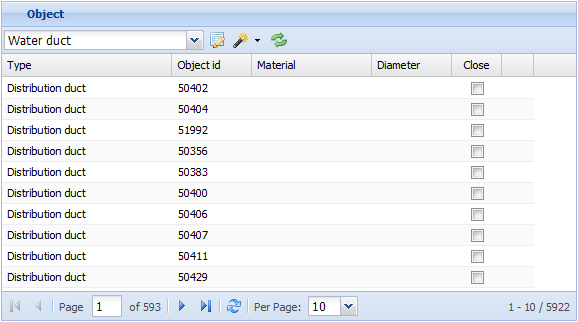
- First, add ducts:
- On the Modelingform, click the drop-down menu for Add water network node
 and select Connect to duct to open the Water duct
 form.
form. - Retrieve to the form the ducts to be sent for modeling – first the main ducts and then distribution ducts (these must be retrieved separately):
- The usage state In use is used as the search criterion (and usually also Undefined).
- Discarded ducts and ducts not in use are not sent for modeling.
- On the Modeling
- When you have retrieved the ducts to the Water ductform, click the Take to modeling
 button to have the ducts displayed on the Modelingform.
 - The type of the nodes sent for modeling and the ID of the node are displayed on the list of nodes:
- Add the nodes connected to the ducts:
- On the Modelingform, click Add nodes connected to ducts
 . This function is used to add the nodes that are connected to the start and end of the ducts. If the network is complete, the selected network ducts and the related nodes have now been added to the model.
- On the Modeling
- Add consumer points:
- Click the drop-down menu for for Add water network node
 and select Pick consumer point to open the Consumer Point form. Retrieve to the form the consumer points you want to use for modeling. On the Consumer Point form, click Take to modelling
 to send the consumer points for modeling.
- Click the drop-down menu for for Add water network node
Note: You will most likely have to separately add any network nodes that have no ducts connected to them, such as pumping stations and water tanks.
Planned network
When modeling plans, a specific type of modeling is used.
When you start completing the fields on the Modelingform, go to the Network to use menu and select the network model under which the planned network is to be modeled.
The planned network part will be added to the modeling of the plan, as described in the Modeling of an constructed network chapter. Only planned network nodes are added to the modeling of the plan. The usage state of such nodes is marked as Planned.
When the plan is modeled, the selected constructed network is sent for modeling together with the plan objects.
Temporary water usage
The modeling of temporary water usage can be used to analyze, for example, the water intake of a sprinkler connection or the effect that a new, major water consumer would have on the network. A separate modeling of temporary water usage is created for temporary water usage.
- Complete the basic data for the modeling of temporary water usage and, on the Network to use menu, select the model of an constructed network under which you want to model the temporary water usage.
- Create a new object in KeyAqua for the modeling of temporary water usage: Temporary water usage. Use the Water other nodes form for this. Select Temporary water intake as the node.
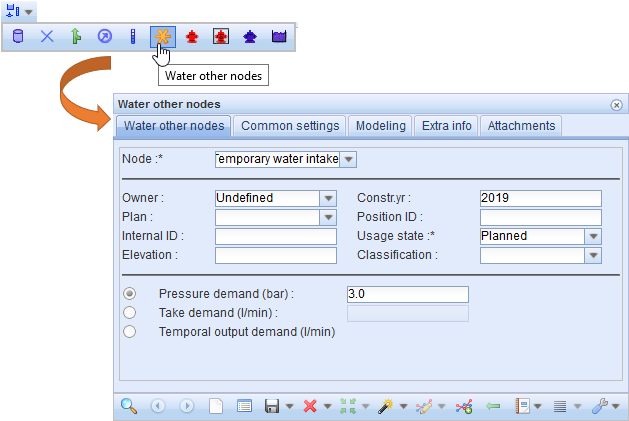
- Select one of the requirements for temporary water intake at the bottom of the form (only one selection is valid at a time):
- Pressure demand (bar)
- Take demand (l/min)
- Temporal output demand (l/min)
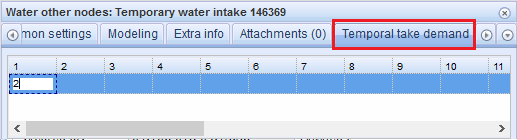
- If you select the Temporal output demand, a new tab will be activated on the form for the completion of the output values.
- Click Save form
 to save the values you entered.
 - Place the symbol for temporary water intake on the map in the location in which the water intake is planned to be implemented. However, place it at a distance of a few metres from the network so that the modeling application will not classify it as a network node.
- After you have created the Temporary water intake object and placed it on the map, add it as an object to the modeling of temporary water intake. To do this, go to the drop-down menu of the Add water network node and click Pick other node. On the Water other nodes form, click Take to modeling
 to add the temporary water intake object as an object on the modeling form.
- The constructed network that has been selected for modeling is sent for modeling together with the location of temporary water intake and the details concerning water intake.
- Note! Do not add other objects to the modeling for temporary water usage!
- Click Send for modeling
 .
.
Quality
Modeling of quality is used to model the age of water (retention period) and origin of water (the water source from where the network node mainly takes water).
Separate quality modeling is used for this purpose.
- Enter the ID for modeling and select Quality as the type.
- On the menu for Network to use, select the network model you want to use for the modeling of quality.
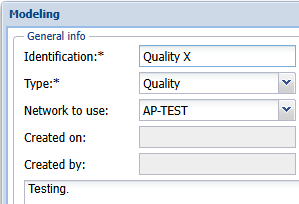
- Do not add any network objects to the modeling of quality. For quality modeling, only the selected constructed network is sent for modeling.
- Click Send for modeling
 . The modeling takes a little longer than in other cases.