This article provides detailed instructions on how to navigate and manage networks in the KeyCom Nexus system.
Learn how to:
- Understand the map view to utilize network data and available tools
- Browse and search network information efficiently
- Utilize map and coordinate tools
Map view
The Map view in KeyCom Nexus provides an interface for visualizing and managing telecom network infrastructure. It enables users to see all network assets—such as fiber optic cables, splices and telecom premises—in one centralized location where you can easily highlight objects from the map. The Map view also supports area-based permissions, allowing authorized personnel and contractors to access and update information from the field using their mobile device.
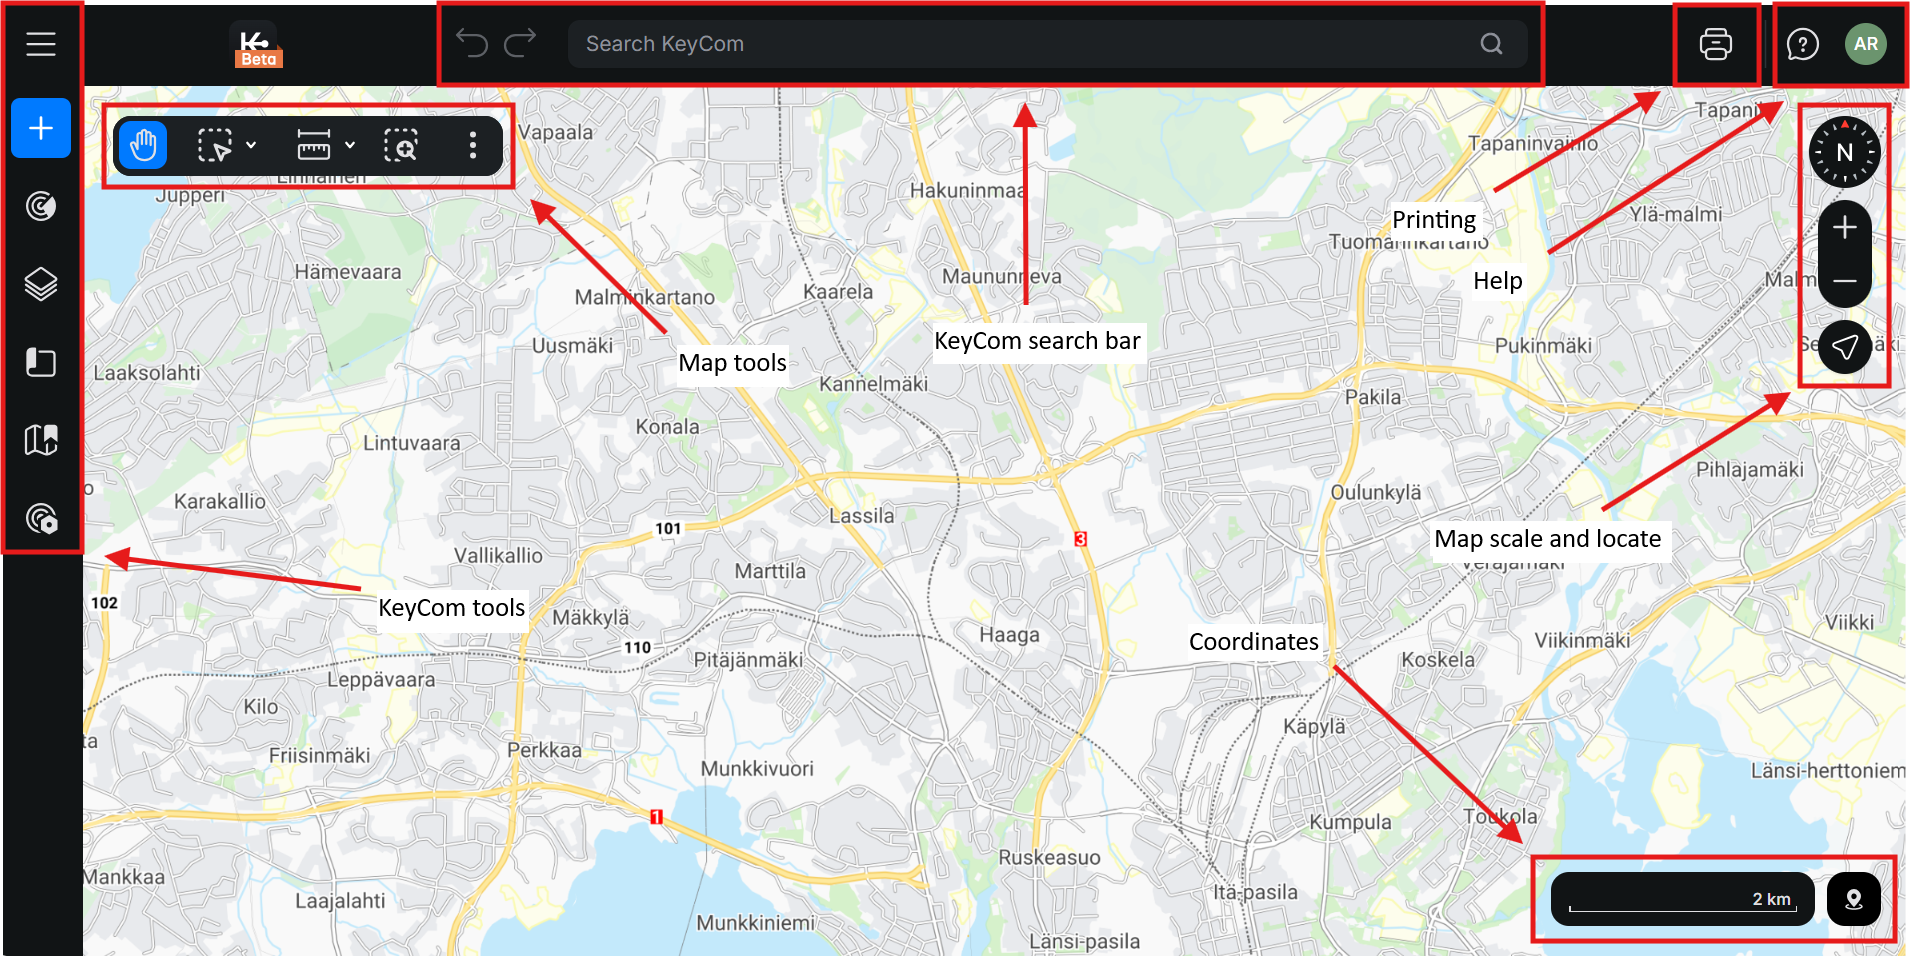
- Object search: Allows you to search network objects from the KeyCom Nexus system.
- KeyCom Nexus tools: A group of map tools in moveable bar that include Measure tool, Print, Google Maps, Copy maplink and Refresh map. Map tools can be found at the top of the map view, with additional settings available under the drop-down menu.
- Map scale and locate: Adjust the map scale and orientation to your liking and locate yourself on the map.
- Coordinate system: The coordinate section displayed in the bottom-right corner shows the map coordinates.
- KeyCom tools: Available KeyCom Nexus tools and features including Network, Layers, Plans, Saved, Views and Other tools.
Saving a map view
- Click the Views button from the KeyCom Nexus tools to save and apply map views in the system.
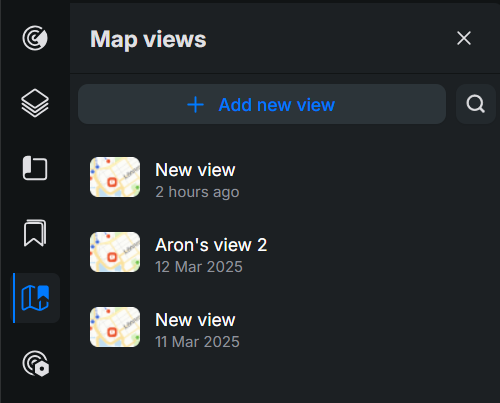
- Click + Add new view and name it.
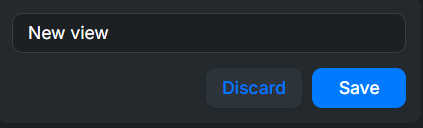
- Click Save.
- The new Map view can be found from the on top of the list with a time stamp.
Panning the map
You can pan the map by clicking Pan from the Map tools. Hold down the left button of your mouse and move the mouse pointer across the map to pan the map.
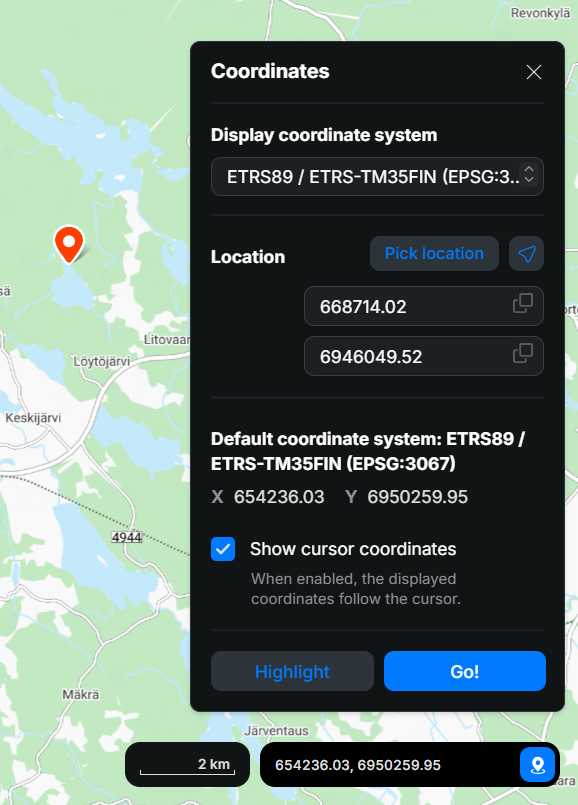
Coordinates
The coordinate section displayed in the bottom-right corner shows the map coordinates for the location of the mouse pointer. By opening the Coordinates menu from the right corner you can all the settings related to the coordinate system in KeyCom Nexus. Coordinates are visible in the field, with the first one being the east coordinate and the second one the north coordinate. The coordinate values are separated by a single space.
Coordinates menu
- Display coordinate system: Select from various coordinate systems using the drop-down menu. The chosen system will be applied to all functions.
- Location: Click Locate me to find your current position and display your device's coordinates.
- Pick location: To select a specific coordinate point on the map, click Pick location and then click on your desired spot on the map. A location symbol will appear on the map
 . The coordinates of the selected point will appear in Coordinate fields.
 - Coordinate fields (X, Y): By using the Pick location tool, you can select coordinates for these fields. The X coordinate will appear in the upper field, and the Y coordinate in the lower field. You can also Insert or Copy a coordinate value manually to the fields.
- Default coordinate system: Shown in the center of the form, it updates automatically based on the mouse pointer's position.
- Show cursor coordinates: If this checkbox is selected, the coordinates of the cursor will be displayed in real time. Deselect the checkbox to turn off this feature.
- Highlight: Highlight the coordinates applied in the Coordinates fields.
Picking the coordinates of an object
You can pick the exact coordinates of an object in the following way:
- Disable the Show cursor coordinates checkbox.
- Position the mouse pointer over the object. The exact object coordinates are displayed in the coordinate field.
- You can copy the values to your clipboard by clicking Copy
 .
.

Changing scale
You can zoom in and out using your mouse wheel. When you scroll the mouse wheel away from yourself, the map zooms in, and the map center is the mouse pointer’s position on the map.
You can also zoom the map by clicking Zoom in +. This zooms the map in while the map center remains the same. Zooming in is carried out one scale level at a time. You can zoom the map out by clicking Zoom out -. This zooms the map out while the map center remains the same. Zooming out is carried out one scale level at a time. The mouse pointer’s position on the map is used as the map center. 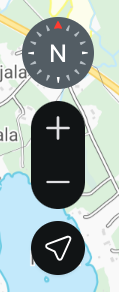
To quickly switch to a different scale, open the Map Scale drop-down menu and select your preferred option.
Map tools
This section covers functionalities such as Info tool, Google Maps, Copy map link and Refresh map. Map tools can be found at the top of the map view, with additional settings available under the drop-down menu:

Info tool
You can use the Info tool to view information network objects. Click Info and then use the left mouse button to click the selected objects shown on the map. You can only select objects that are visible on the map; in other words, only the activated object layers are available during the selection. You can retrieve information on more than one object at the same time. There are several possible ways to retrieve information on multiple objects.
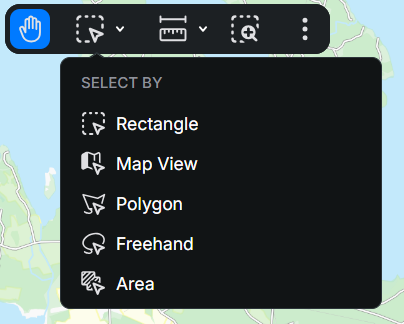
From the drop-down menu next to the Info tool, you can select one of the following five functions to pick objects from the map:
- Rectangle: After clicking the Info tool button you can define a rectangular area by selecting the area you want by holding down the left mouse button.
- Map view: When you select Map view area, the software retrieves information on all objects currently displayed on the screen.
- Polygon: You can use the Polygon function to define a polygon area on the map and pick all objects.
- Freehand: Define a free area by hand and pick all objects inside of it.
- Area: You can use the Area function to select an area that has been saved in the system using the Area form, and to retrieve the objects in that area.
The query returns an Info list in which the search results are grouped.
Zooming to an area
You can zoom the map in by holding down the left mouse button to select the map area to zoom in. The map is zoomed in when you release the left mouse button. This is a fast way to zoom in to a larger scale. 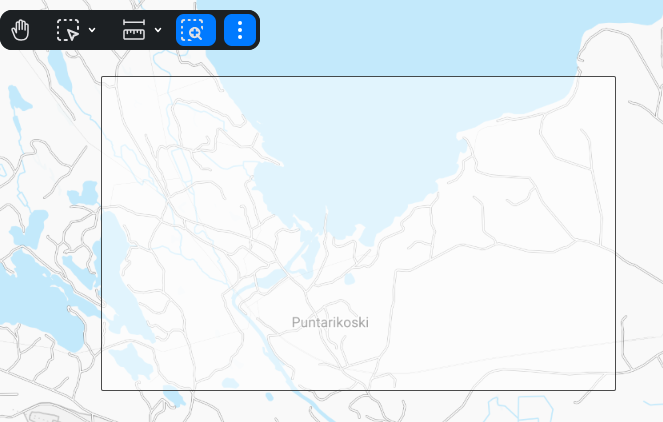
Google Maps
The services mentioned in this chapter are provided by Google. Click Google Maps to open a new browser tab to view the current KeyCom Nexus map view on the Google Maps website.
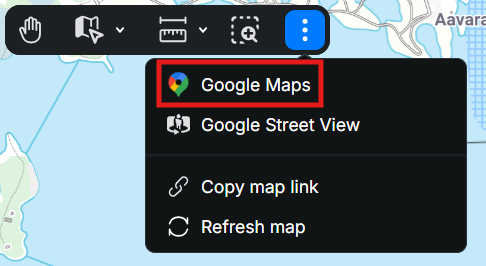
You can view a street view using the Google Maps Street View™ service:
- In the Google Maps
 drop-down menu, select Google Maps Street View.
 - Point to the road/street location that you want to view and click to open the view in question in Google Maps Street View.
Street Smart View (this function is subject to a separate order)
The Street Smart View function in the Google Maps drop-down menu provides a 360-degree street view that is true to size. With the street view, you can easily manage street, road, and infrastructure assets. The BlomStreet cloud service is an additional feature that is to be deployed separately.
Map link
Use the Map link tool to copy the current map view and send a URL to your colleague or partner company.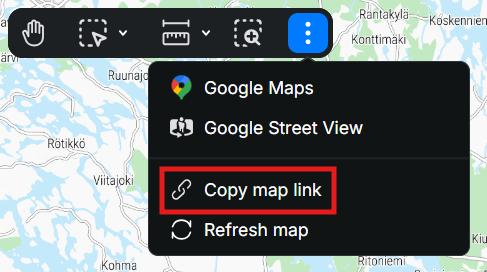
- Click Copy map link in Map tools.
- Paste it into an email or add it as a browser bookmark.
- To return to the view later, copy the address into your browser’s address bar or use the bookmark you saved.
Refreshing the map
You can view the changes made to a map by clicking Refresh map. This function is useful, for example, when the map data is being updated at the same time on another workstation, in which case changes are not necessarily immediately visible in the area that you are viewing. 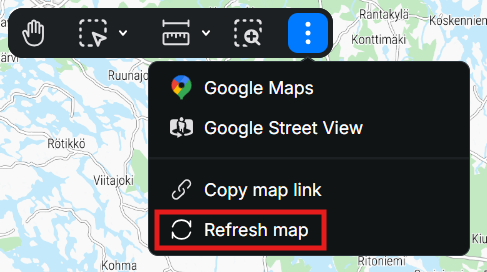
Browsing and searching network information
To effectively gather relevant network information from the KeyCom Nexus system, it is important to understand how to utilize search tools such as KeyCom Nexus seach bar and Info tool.
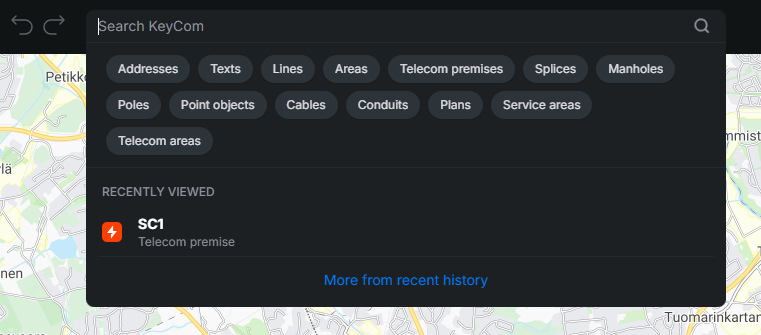
KeyCom Nexus search bar
The KeyCom Nexus search bar can be found on top of the map view. It allows you to search existing KeyCom Nexus objects within the system.
- Enter the object's identification number and press the search button. The search can also be filtered by choosing a filter group below the search bar.
- The network objects that match the search are then presented in suggested search results.
- You can later see the recently viewed objects from the bottom half of the form.
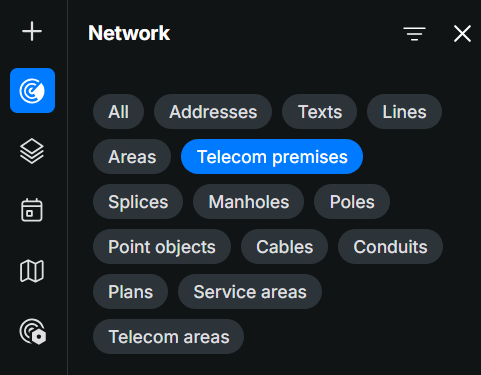
Network search
You can find the Network search feature in the Side bar. This feature allows you to filter and search for existing KeyCom Nexus objects within the system. You are able to refine your search using various filters, view matching results, and quickly navigate to the objects you need.
- To refine your search, select a desired object type from the list.
- Search by defining a search area with the Info tool. The search results will appear in a list below the search bar. Searching with the Info tool will then only return objects related to that specific object type and filters unless you selected All.
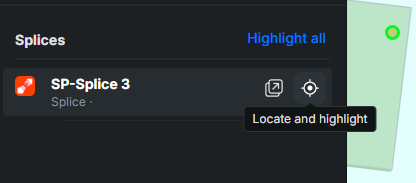
- Locate and highlight an object on the map by selecting the Locate and highlight button beside it.
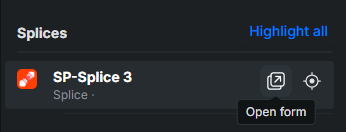
- You are also able to examine information by clicking Open form button.
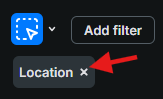
- To do a new search, remove the current filters from the search, add new ones or just define a new area with the Info tool.
Additional filters
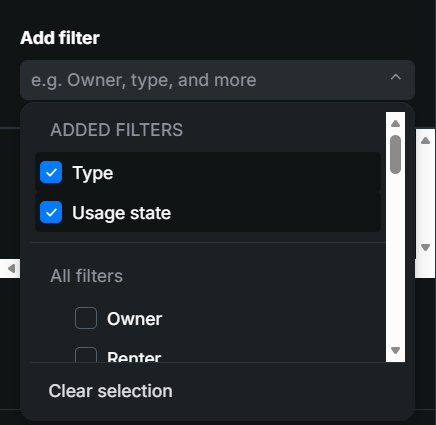
If you want to make the search more precise, add filters to your search by clicking Add filter.
- Select the desired filter types from the the Add filter drop-down menu.
- Note! To confirm your selections, click anywhere outside the drop‑down menu. The selected filters will then be chosen.
- Note! To confirm your selections, click anywhere outside the drop‑down menu. The selected filters will then be chosen.
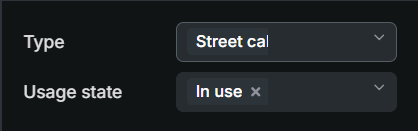
- Then select the correct filters from the drop-down menus. For example, Street cabinet for Type and In use for Usage state.
- If needed, determine a geographic location for the search.
- Then, click Apply, The system takes you back to the previous window.
